Chapter 6. Filesystems
6.1 Introduction
Given that both the processor and the main memory are resources in the system, till this point, we have seen how a kernel of an operating system works as a resource manager, 539kernel manages these resources 1 and provides them to the different processes in the system.
Another role of a kernel is to provide a way to communicate with external devices, such as the keyboard and hard disk. Device drivers are the way of realizing this role of the kernel. The details of the external devices and how to communicate with them are low-level and may be changed at any time. The goal of a device driver is to communicate with a given device by using the device's own language2 in behalf of any component of the system (e.g. a process) that would like to use the device. Device drivers provide an interface so it can be called by the other system's components in order to tell the device something to do, we can consider this interface as a library that we use in normal software development. In this way, the low-level details of the device is hidden from the other components and whenever these details changed only the code of the device driver should be changed, the interface can be kept to not affect its users. Also, hiding the low-level details from driver's user can ensure the simplicity of using that driver.
The matter of hiding the low-level details with something higher-level is too important and can be found, basically, everywhere in computing and the kernels are not an exception of that. Of course, there is virtually no limit of providing higher-level concepts based on a previous lower-level concept, also, upon something that we consider as a high-level concept we can build something even higher-level. Beside the previous example of device drivers, one of obvious examples where the kernels fulfill the role of hiding the low-level details and providing something higher-level, in other words, providing an abstraction, is a filesystem which provides the well-known abstraction, a file.
In this chapter we are going to cover these two topics, device drivers and filesystem by using 539kernel. As you may recall, it turned out that accessing to the hard disk is an important aspect for virtual memory, so, to be able to implement virtual memory, the kernel itself needs to access the hard disk which makes it an important component in the kernel, so, we are going to implement a device driver that communicate with the hard disk in this chapter. After getting the ability of reading from the hard disk or writing to it, we can explore the idea of providing abstractions by the kernel through writing a filesystem that uses the hard disk device driver and provides a higher-level view of the hard disk that we all familiar with instead of the physical view of the hard disk which has been described previously in chapter . The final result of this chapter is version NE of 539kernel.
6.2 ATA Device Driver
No need to say the hard disks are too common devices that are used as secondary storage devices. There are a lot of manufacturers that manufacture hard disks and sell them, imagine for a moment that each hard disk from a different manufacturer use its own way for the communication between the software and the hard disk, that is, the method X should be used to be able to communicate with hard disks from manufacturer A while the method Y should be used with hard disks from manufacturer B and so on, given that there are too many manufacturers, this will be a nightmare. Each hard disk will need its own device driver which talks a different language from the other hard disk device drivers.
Fortunately, this is not the case, at least for the hard disks, in these situations, standards are here to the rescue. A manufacturer may design the hard disk hardware in anyway, but when it comes to the part of the communication between the hard disk and the outside world, a standard can be used, so, any device driver that works with this given standard will be able to communicate with this new hard disk. There are many well-known standards that are related to the hard disks, small computer system interface (SCSI) is one of them, another one is advanced technology attachment (ATA), another well-known name for ATA is Integrated Drive Electronics (IDE). The older ATA standard is now known as Parallel ATA (PATA) while the newer version of ATA is known as Serial ATA (SATA). Because ATA is more common in personal computers we are going to focus on it here and write a device driver for it, SCSI is more common in servers.
As in PIC which has been discussed in chapter , ATA hard disks can be communicated with by using port-mapped I/O communication through the instructions in and out. But before discussing the ATA commands that let us to issue a read or write request to the hard disk, let's write two routines in assembly that can be used used as C functions in C code and perform the same functionality of the instructions in and out.
If you don't recall, the instruction out is used to write some bytes on a given port number, so, if we know the port number that a device (e.g. hard disk) receives commands from, we can use the instruction out to write a valid command to that port. On the other hand, the instruction in reads data from a given port, for example, sometimes after we send a command to a device, it responds by writing something on a specific port, the instruction in can be used to read this value.
The assembly code of the both routines that we are going to define next should reside in starter.asm anywhere between bits 32 and the beginning of start_kernel routine. The following is the code of dev_write which can be used by C kernel code to write to a given port. In C, we can see that it has this prototype: dev_write( int port, int cmd ).
dev_write:
    ; Part 1
    push edx
    push eax

    ; Part 2
    xor edx, edx
    xor eax, eax

    ; Part 3
    mov dx, [esp + 12]
    mov al, [esp + 16]

    ; Part 4
    out dx, al

    ; Part 5
    pop eax
    pop edx

    ret
The core part of this routine is part four which contains the instruction out that sends the value of AL to the port number which is stored in DX. Because we are using these two registers 3, we push their previous values into the stack and that's performed in the first part of the routine. Pushing the previous values of these registers lets us restore them easily after the routine finishes its work, this restoration is performed in the fifth part of the routine right before returning from it, this is an important step to make sure that when the routine returns, the environment of the caller will be same as the one before calling the routine.
After storing the previous values of EAX and EDX we can use them freely, so, the first step after that is to clear their previous values by setting the value 0 to the both of them, as you can see, we have used xor and the both operands of it are the same register (hence, value) that we wish to clear, this is a well-known way in assembly programming to clear the value of a register 4. After that, we can move the values that have been passed to the routine as parameters to the correct registers to be used with out instruction, this is performed in the third part of the routine 5.
Beside dev_write, we need to define another routine called dev_write_word which is exactly same as dev_write but write a word (2 bytes) instead of one byte to a port. The following is the code of this routine.
dev_write_word:
    push edx
    push eax

    xor edx, edx
    xor eax, eax

    mov dx, [esp + 12]
    mov ax, [esp + 16]

    out dx, ax

    pop eax
    pop edx

    ret
As you can see, the only difference between dev_write and dev_write_word is that the first one uses the register al (8 bit) as the second operand of out while the second one uses ax (16 bit) instead, so, a word can be written to the port.
The following is the code of the routine dev_read which uses the instruction in to read the data from a given port and returns them to the caller, its prototype can be imagined as char dev_read( int port ).
dev_read:
    push edx

    xor edx, edx
    xor eax, eax

    mov dx, [esp + 8]

    in ax, dx

    pop edx

    ret
For the same reason of restoring the previous environment when returning to the caller, the routine pushes the value of edx into the stack, then both of EDX and EAX are cleared since they will be used by the instruction in. After that, the value of the passed parameter which represents the port number that caller wishes to read from, is stored in DX. Finally, in is called, the result is stored in AX, since the first operand of in is AX and not AL then a word will be read from the port and not a single byte. The decision of using AX instead of AL was made here because of our needs as you will see later, if you need to read just one byte for some reason you can define another routine for that. Finally, the previous value of EDX is restored and the routine returns.
You may ask, why did we only store and restore the previous value of EDX and not EAX which was also used in the code of the routine? The reason is that dev_read is a function that returns a value, and according to the calling convention the returned value from a function should be stored in the register in EAX, so, the value of EAX is intended to be changed when return to the caller, therefore, it will not be correct, logically, to restore the the previous value of WAX when dev_read returns.
Because the ultimate goal of defining both dev_write and dev_read is to make them available to be used in C code, so, the lines global dev_write, global dev_write_word and global dev_read should be written in the beginning of starter.asm after global enable_paging.
6.2.1 The Driver
One ATA bus in the computer's motherboard makes it possible to attach two hard disks into the system, one of them is called master drive which is the main one that the computer boots from, the other disk is known as slave drive. Usually, a computer comes with two ATA buses instead of just one, which means up to four hard disks can be attached into the computer. The first one of those buses is known as the primary bus while the second one is known as the secondary bus.
Terms that combine a bus name with a device name are used to specify exactly which device is being discussed, for example, primary master means the master hard disk that is connected to the primary bus while secondary slave means the slave hard disk which is connected to the secondary bus.
The port numbers that can be used to communicate with the devices that are attached into the primary bus start from 0x1F0 and ends in 0x1F7 each one of these ports has its own functionality. The port numbers from 0x170 to 0x177 are used to communicate with devices that are attached into the secondary bus, so, there are eight ports for each ATA bus.
For the sake of simplicity, our device driver is going to assume that there is only a primary master and all read and write requests should be sent to this primary master, therefore, our device driver uses the port number 0x1F0 as the base port to send the commands via PIC.
You may ask, why are we calling this port number a base port? As you know that all the following port numbers are valid to communicate with the primary ATA bus: 0x1F0, 0x1F1, 0x1F2, 0x1F3, 0x1F4, 0x1F5, 0x1F6, 0x1F7, so, we can add any number from 0 through 7 to the base port number of the primary bus 0x1F0 to get a correct port number, the same holds true with the secondary ATA bus which its base port number is 0x170. So, we can define the base port as a macro (or even variable) as we will see in our device driver, then we can use this macro by adding a specific value to it from 0 through 7 to get a specific port, the advantage of doing so is the easiness of changing the value of the base port to another port without the need of changing the code itself.
Before starting in the implementation of the driver, let's create two new files: ata.h and ata.c which will contain the code of the ATA device driver which provides an interface for the rest of the kernel to write to and read from the disk. The following is the content of ata.h and the details of the functions will be discussed in the next subsections.
#define BASE_PORT 0x1F0
#define SECTOR_SIZE 512

void wait_drive_until_ready();

void *read_disk( int );
void write_disk( int, short * );

void *read_disk_chs( int );
void write_disk_chs( int, short * );
6.2.1.1 Addressing Mode
As in the main memory, the hard disks use addresses to read the data that are stored in a specific area of the disk, the same is applicable in write operation, the same address can be used to write on the same specific area. There are two schemes of hard disk addresses, the older one is known as cylinder-head-sector addressing (CHS) while the newer one which more dominant now is known as logical block addressing (LBA).
In chapter we have covered the physical structure of hard disks and we know from that discussion that the data are stored in small blocks known as sectors, also, there are tracks which each one of them consists of a number of sectors, and finally, there are heads that should be positioned on a specific sector to read from it or to write to it. The scheme CHS uses the same concepts of physical structure of hard disk, the address of a given sector on the hard disk should be composed by combining three numbers together, the cylinder (track) that this sector reside on, the sector that we would like to access and the head that is able to access this sector. However, this scheme is obsolete now and LBA is used instead of it.
In LBA, a logical view of a hard disk is used instead of the physical view. This logical view states that the hard disk is composed of a number of logical blocks with a fixed size, say, n bytes. These blocks are contagious in a similar way of the main memory and to reach any block you can use its own address, the addresses start from 0, the block right after the first one has the address 1 and so on. As you can see, addressing in LBA is more like the addressing of the main memory, the main difference here is that in current computers each address of the main memory points to a byte in memory while an address in LBA points to a block which can be a sector (512 bytes) or even bigger.
6.2.1.2 Reading from Disk
In this subsection we are going to implement both read_disk_chs and read_disk which send commands to an ATA hard disk via the available ports in order to read a sector/block from the disk. The first one of those functions uses CHS scheme while the second one uses LBA scheme. In the next discussions, I'm going to use the symbol base_port to indicate the base port of one of ATA ports, in our case, the base port is 0x1F0 since we are going to use the primary bus in our device driver, but what we are discussing is applicable to any ATA bus with any base port number.
To issue a read command the value 0x20 should be sent to base_port + 7, but before doing that, a number of values should be set in the other ports in order to specify the address that we would like to read from. These ports are the following: In base_port + 2 the number of sectors/blocks that we would like to read in this operation should be set.
The value that should be written to base_port + 6 specifies more than one thing, bit 6 of this value specifies whether we are using CHS or LBA in the current read request, when the bit's value is 0 then CHS is being used while the value 1 means that LBA is being used. The bits 5 and 7 of this value should always be 1. The bit 4 is used to specify the drive that we would like to read from, the value 0 for the master drive while 1 for the slave drive. In the case that we are using CHS, then the first four bits (0 to 3) of this value is used to specify the head while in the case that we are using LBA, these bits store a part from the LBA address, this part starts from bit 24 to bit 27.
When the current addressing mode is CHS, the sector number that we would like our read operation to start from should be sent to base_port + 3, the low part of the cylinder number should be sent to base_port + 4 and the high part of the cylinder number should be sent to base_port + 5. The following table summarizes the parameters to the read command when the addressing mode is CHS.
| Port Number | Purpose (in CHS) |
|---|---|
| base_port + 2 | Number of Sectors to Read |
| base_port + 3 | The Sector Number to Read From |
| base_port + 4 | Lower Part of the Cylinder Number |
| base_port + 5 | Higher Part of the Cylinder Number |
| base_port + 7 | Command Port. Read Command: 0x20 |
| Port Number | Bit(s) | Purpose (in CHS) |
|---|---|---|
| base_port + 6 | 0-3 | The Head |
| 4 | Drive to Use (0 = Master, 1 = Slave) | |
| 5 | Always 1 | |
| 6 | Addressing Mode (0 for CHS) | |
| 7 | Always 1 |
Once the read command is issued with the right parameters passed to the correct ports, we can read the value of base_port + 7 to check if the disk finished the reading operating or not by reading the eighth bit (bit 7) of that value, when the value of this bit is 1 that means the drive is busy, once it becomes 0 that means that the operation completed.
When the reading operation is completed successfully, the data are brought to base_port which means we need to read from it and put the required data in the main memory. The following is the code of read_disk_chs that should reside in ata.c. Don't forget to include ata.h when you create ata.c.
void *read_disk_chs( int sector )
{
    // Part 1

    dev_write( BASE_PORT + 6, 0x0a0 );
    dev_write( BASE_PORT + 2, 1 );
    dev_write( BASE_PORT + 3, sector );
    dev_write( BASE_PORT + 4, 0 );
    dev_write( BASE_PORT + 5, 0 );
    dev_write( BASE_PORT + 7, 0x20 );

    // ... //

    // Part 2
    wait_drive_until_ready();

    // ... //

    // Part 3

    short *buffer = kalloc( SECTOR_SIZE );

    for ( int currByte = 0; currByte < ( SECTOR_SIZE / 2 ); currByte++ )
        buffer[ currByte ] = dev_read( BASE_PORT );

    return buffer;
}
In the first part of read_disk_chs we send the required values to the appropriate ports as we have described above. In the port base_port + 6 we set that the drive is 0 and the head is 0, also, we set that the addressing mode that we are currently using is CHS. In port base + 2 we set that we would like to read one sector, that is, the function read_disk_chs reads 512 bytes from disk with each call. In port base_port + 3 we set the sector number that we would like to read, as you can see, this number is passed through the parameter sector, so, the caller can specify the sector that it would like to read. In both base_port + 4 and base_port + 5 we specify the cylinder that we would like to read from, which is cylinder 0. Finally, we issue a read request to the ATA bus by writing 0x20 to base_port + 7. For the sake of simplicity, we have used fixed values for a number of parameters here, in real situations, those fixed values should be more flexible. However, using LBA will provide us more flexibility with the simplicity that we are interested on.
The second part of read_disk_chs calls the function wait_drive_until_ready which makes sure that the code after calling it, will not be executed until the device finishes its work. The following is the code of this function.
void wait_drive_until_ready()
{
    int status = 0;

    do
    {
        status = dev_read( BASE_PORT + 7 );
    } while ( ( status ^ 0x80 ) == 128 );
}
The function wait_drive_until_ready reads the value of the port base_port + 7 which is going to contain the status of the drive. As we mentioned earlier, the eighth bit (bit 7) of this value indicates whether the drive is busy or not, with each iteration of the loop, the function reads this value and checks whether the value of the eighth bit is 1 by using bitwise operations, if this is the case, that means the drive is still busy in completing the requested operation (reading operation in our current case), so, we need to wait for it until it finishes and we spend this time of waiting in reading the value of the port and check the eighth bits over and over again until the drive finishes, this technique of checking the device's status over and over again until it finishes an operation is known as busy waiting.
When the read operation finishes, we can read the target content word by word 6 from the base port and that's the job of the third part of read_disk_chs which reads a word each time and stores it in a buffer that we dynamically allocate from the kernel's heap.
We have used the type short for the variable buffer because the size of this type in 32-bit architecture is 2 bytes, that is, a word. In the condition of the for loop we used currByte < ( SECTOR_SIZE / 2 ) instead of currByte < SECTOR_SIZE due to the fact that we are reading two bytes in each iteration instead of one byte. Finally, the memory address which buffer points to, is going to contain the sector that we have just read from the disk, this memory address will be returned to the caller.
Now, we can turn to the other read function read_disk which uses LBA scheme instead of CHS. In fact, this new function will be almost similar to read_disk_chs, the main differences will be with some values that we are passing to the ports of ATA bus. In LBA scheme, base_port + 6 should be changed to indicate that the scheme that we are using is LBA and we can do that as we mentioned before by setting the value 1 to bit 6. The other difference in this port value is that the bits 0 to 3 should contain the bits 24 to 27 of the logical block address that we would like to read from, the other parts of the addresses are divided to the following ports: base_port + 3 contains bits 0 to 7 of that address, base_port + 4 contains bits 8 to 15, base_port + 5 contains bits 16 to 23. Both ports base_port + 2 and base_port + 7 stay the same. The following table summarizes the parameters of read command when LBA is used.
| Port Number | Purpose (in LBA) |
|---|---|
| base_port + 2 | Number of Blocks to Read |
| base_port + 3 | Bits 0-7 from the Logical Block Address |
| base_port + 4 | Bits 8-15 from the Logical Block Address |
| base_port + 5 | Bits 16-23 from the Logical Block Address |
| base_port + 7 | Command Port. Read Command: 0x20 |
| Port Number | Bit(s) | Purpose (in CHS) |
|---|---|---|
| base_port + 6 | 0-3 | Bits 24-27 from the Logical Block Address |
| 4 | Drive to Use (0 = Master, 1 = Slave) | |
| 5 | Always 1 | |
| 6 | Addressing Mode (1 for LBA) | |
| 7 | Always 1 |
The function read_disk receives a parameter named address instead of sector, that is, the logical block address that the caller would like to read the data from, by using bitwise operations the value of this parameter can be divided into the described parts to be filled in the appropriate ports. The rest of read_disk is exactly same as read_disk_chs. To not get a lot of space from the book, the following is the beginning of the new function and the only part that has differences with read_disk_chs.
void *read_disk( int address )
{
    dev_write( BASE_PORT + 6, ( 0x0e0 | ( ( address & 0x0F000000 ) >> 24 ) ) );
    dev_write( BASE_PORT + 2, 1 );
    dev_write( BASE_PORT + 3, address & 0x000000FF );
    dev_write( BASE_PORT + 4, ( address & 0x0000FF00 ) >> 8 );
    dev_write( BASE_PORT + 5, ( address & 0x00FF0000 ) >> 16 );
    dev_write( BASE_PORT + 7, 0x20 );
6.2.1.3 Writing to Disk
In both CHS and LBA, write operation is called via ports exactly in the same way of reading, though, there are two differences. First, the command number to issue a write request is 0x30 which should be written to base_port + 7 after setting the correct values to the ports. Second, after the drive becomes ready to write the required data, we should write a word after the other to base_port until we finish, this is performed by calling the routine dev_write_word which uses the instruction out to perform that job. Need no more discussion, the following two functions are write_disk_chs which uses CHS to write to the disk, and write_disk which uses LBA to write to the disk. Both of them receive a parameter called buffer which is a pointer to the data that we would like to write to the disk. You can see wait_drive_until_ready is called twice, the first one after setting the correct parameters and issuing write command, the second one after requesting to write the words of the buffer into the disk in order to make sure that the write function doesn't return before the disk finishes the write operation.
void write_disk_chs( int sector, short *buffer )
{
    dev_write( BASE_PORT + 6, 0x0a0 );
    dev_write( BASE_PORT + 2, 1 );
    dev_write( BASE_PORT + 3, sector );
    dev_write( BASE_PORT + 4, 0 );
    dev_write( BASE_PORT + 5, 0 );
    dev_write( BASE_PORT + 7, 0x30 );

    wait_drive_until_ready();

    for ( int currByte = 0; currByte < ( SECTOR_SIZE / 2 ); currByte++ )
        dev_write_word( BASE_PORT, buffer[ currByte ] );

    wait_drive_until_ready();
}

void write_disk( int address, short *buffer )
{
    dev_write( BASE_PORT + 6, ( 0x0e0 | ( ( address & 0x0F000000 ) >> 24 ) ) );
    dev_write( BASE_PORT + 2, 1 );
    dev_write( BASE_PORT + 3, address & 0x000000FF );
    dev_write( BASE_PORT + 4, ( address & 0x0000FF00 ) >> 8 );
    dev_write( BASE_PORT + 5, ( address & 0x00FF0000 ) >> 16 );
    dev_write( BASE_PORT + 7, 0x30 );

    wait_drive_until_ready();

    for ( int currByte = 0; currByte < ( SECTOR_SIZE / 2 ); currByte++ )
        dev_write_word( BASE_PORT, buffer[ currByte ] );

    wait_drive_until_ready();
}
6.3 Filesystem
Until now, we have seen multiple examples of presenting a logical higher-level view of something that is low-level, another example of that is a filesystem. A filesystem is a higher-level view of a storage device, this higher-level view makes it easier for the human user (and also the code) to use storage devices. Take hard disks as an example and imagine that we use them based on their low-level view that we have discussed in this chapter, it will be really too hard for us humans to remember what is the logical block address of some data that we need to fetch right now, also, it will be really harder to remember which blocks of the hard disk are free and which of them are not in order to store new data. As an alternative, we can build a logical view based on this low-level method of hard disk's functionality to make it easier for the human user to use the hard disk and hide the low-level's complicated details of hard disks.
Filesystems provide a well-known abstraction called file which is a sequence of bytes that has a name and is reachable by using this name. By providing this abstraction, it will be really easy for the human or even the applications to use the hard disk to store and retrieve data. Beside file abstraction, a filesystem may provide more features, for example, directories (or folders) are usually provided by filesystems in order to let the user to organize her files in a hierarchical way.
To be able to implement the file abstraction we need a way to maintain the list of current files stored in the system and their locations in the disk, due to that, specific filesystems usually use some sort of data structures to maintain the information about the files in a given system, that is, the files' metadata 7. This data structure is stored in the disk for the future use and it is interpretable by the kernel that implements that filesystem, by loading this data structure from the disk and interpreting it correctly, you can reach the files and their organization as the user of the system created them.
The meaning of the term filesystem may differ based on the context. The first meaning of this term which we meant above is a subsystem (component) of an operating system that works based on a specific design to manage the files and directories of a system's user. The other meaning that you may encounter more often in system administration context is the list of all files and directories that the users created in a specific system. In our next discussions I'm going to use the term filesystem to mean the first definition, while I'll use run-time filesystem to mean the second definition. Also, when the term address is used in the next discussions, it means a logical block address.
As in programming languages, a filesystem may be divided into two parts: A design and an implementation. The design of a filesystem tells us how this filesystem stores the information about the run-time filesystem, how the metadata are organized, which data structure is used to fulfill the goal of the filesystem an so on 8. Of course, the design can be there, written on the papers as a brilliant theoretical piece of work but to realize this design, an implementation should be written that uses it 9. For example, a well-known filesystem is FAT (short for: file allocation table) which is an old filesystem that started on 1977 and still in use nowadays. Because its design is available, anyone can write an implementation of it and make her kernel able to read run-time filesystems that have been created by another operating system that uses FAT, Linux kernel is an example of the kernels that have a FAT implementation. As an example of filesystem, we are going to design and implement 539filesystem in this section.
6.3.1 The Design of 539filesystem
To make the implementation of 539filesystem as simple as possible, many restrictions is presented in its design. First, there is only one directory in the run-time filesystem that uses 539filesystem which is the root directory, all the files that are created by the user are stored in this directory and there is no way to create new directories. Second, the maximum size of a file is 512 bytes and finally, when a file is created there is no way to modify it, its content is written when it's created and that's it! I know, you may think that these are too harsh restrictions, I agree, but these restrictions help in providing a too simple and elegant implementation of a real filesystem that can be extended easily to get rid of these restrictions.
The data structure that will be used to maintain the metadata of the run-time filesystem is linked-list which is a simple data structure that is known for its slow search operation but fast insert operation, its simplicity is the reason of choosing it for 539filesystem, real modern filesystems use more complex data structures to make the performance of the filesystem better.
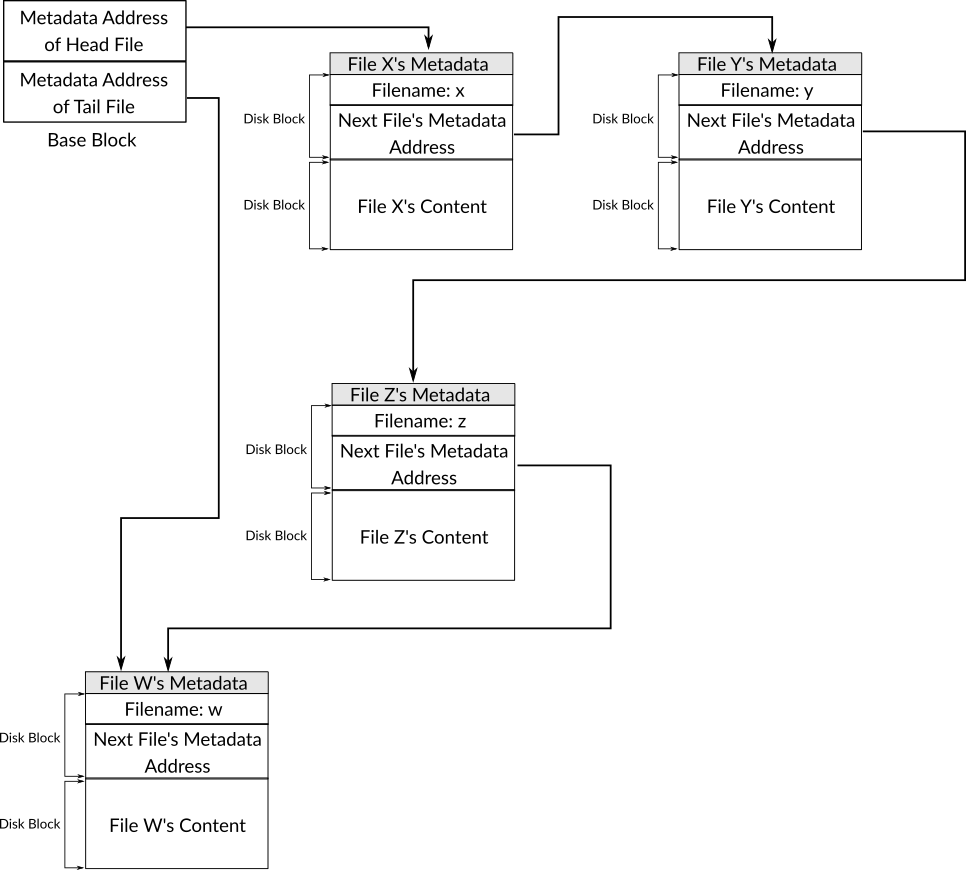
Figure 1: An Overview of 539filesystem Design
In 539filesystem, the block that has the address 100 in the disk is known as the base block, from this block we can reach the whole run-time filesystem. The base block is divided into two parts, the size of each one of them is 4 bytes, the first part is the address of the metadata of the first file that has been created in the run-time filesystem, that is, the head file 10 while the second part is the address of the metadata of the last file that has been created in the run-time filesystem, that is, the tail file 11.
Each file has its own metadata that contains file's name and the next field which stores the metadata address of the next file that has been created. The length of the filename is 256 bytes and the size of "next" field is 4 bytes. When there is no next file, the value 0 is stored in the "next" field of the last file's metadata, that is, the tail file.
It should be obvious now how can we reach all files in a run-time filesystem that uses 539filesystem, starting from the base block we get the metadata address of the head file and by using the "next" field from this metadata we can reach the metadata of the next file and the process continues until we reach the tail file.
The metadata of each file is stored in the block right before the content of the file which will be stored in one block only given that the size of a block is 512 bytes 12. For example, if the metadata of file A is stored in the address 103, then the content of this file is stored in the address 104. By using this design, the basic functionalities of filesystems can be provided. Figure 1 shows an overview of 539filesystem design where four files stored in the system, x, y, z and w.
6.3.2 The Implementation of 539filesystem
Before getting started in implementing the proposed design in the previous section, let's define two new files: str.h and str.c which contain string related function that can be useful when we write our filesystem. Two functions will be implemented in str.c and they are strcpy which copies a string from a location to another, and strcmp which compares two strings, if they are equals then 1 is returned, otherwise 0 is returned. There is no need to explain the details of the code of these two functions since they depend on the normal way which C uses with strings. The following is the content of str.h.
void strcpy( char *, char * );
int strcmp( char *, char * );
The following is the content of str.c.
#include "str.h"

void strcpy( char *dest, char *src )
{
    int idx = 0;

    while ( *src != '\0' )
    {
        dest[ idx ] = *src;

        src++;
        idx++;
    }
}

int strcmp( char *str1, char *str2 )
{
    while ( *str1 != '\0' )
    {
        if ( *str1 != *str2 )
            return 0;

        str1++;
        str2++;
    }

    if ( *str2 != '\0' )
        return 0;

    return 1;
}
Now we can start implementing 539filesystem. The first step as usual is to create the files that hold the functions related to our filesystem: filesystem.h and filesystem.c. The following is the content of filesystem.h.
#define BASE_BLOCK_ADDRESS 100
#define FILENAME_LENGTH 256

typedef struct
{
    int head, tail;
} base_block_t;

typedef struct
{
    char filename[ FILENAME_LENGTH ];
    int next_file_address;
} metadata_t;

base_block_t *base_block;

void filesystem_init();
void create_file( char *, char * );
char **list_files();
char *read_file( char * );

// Auxiliary Functions
metadata_t *load_metadata( int );
int get_address_by_filename( char * );
int get_prev_file_address( int );
int get_files_number();
First we define two macros, BASE_BLOCK_ADDRESS and FILENAME_LENGTH. The first one is the address of base block in the disk, as we have mentioned earlier, this address is 100. The second one is the maximum length of a filename in 539filesystem, and we mentioned earlier that this length is 256.
Then we define two structures as types: base_block_t and metadata_t, based on our discussions on 539filesystem design, you may have noticed that base_block_t represents the base block, it has two fields, each one of them of size 4 bytes, the first one is head and the second one is tail. The type metadata_t represents the metadata of a file, it has two fields as we described before, the first one is the filename and the second one is the metadata address of the next file. These two structures are based on linked-list data structure, and we are going to use them to load the data that they represent from the disk, manipulate them while they are in the main memory, then write them back to the disk in order to make the run-time filesystem persistent.
Then the global variable base_block is defined, which is the memory address that contains the base block after loading it from the disk, as we have said, this loaded copy is the one that we are going to update when the user performs a transactional operation on the run-time filesystem such as creating a new file for example.
After including filesystem.h in filesystem.c the first function that we are going to implement is filesystem_init which is an initializer that will be called once the kernel starts. Its code is too simple, it is going to use the ATA device driver to read the base block from the disk to the main memory and stores the memory address of this loaded data in the global variable base_block.
void filesystem_init()
{
    base_block = read_disk( BASE_BLOCK_ADDRESS );
}
We need to include filesystem.h in main.c and call function filesystem_init by putting the line filesystem_init(); in kernel_main of main.c after the line scheduler_init();. The rest of functions will be discussed in the following sub-sections.
6.3.2.1 Creating a New File
Let's begin with the function create_file, we mentioned before that there is no write operation in 539filesystem, instead, the content of a new file is written in the same operation that creates a new file. Basically, create_file operation should decide the disk address that the new file and its metadata should be stored in, of course, in real-world situation, the filesystem should be sure that this disk address is free and doesn't contain a part of another file. After deciding the disk address of this new file, the metadata of the file should be stored in the block that this address points to, and in the next block the content of this file should be stored. The metadata of the new file can be initialized by using the type metadata_t and after that it can be stored into the disk by using ATA device driver.
Beside writing the metadata and the content of the file on the disk, creating a new file in 539filesystem is equivalent to inserting a new item in a linked-list, so, the base block need to be modified to make sure that the new file is reachable later. To do that, the metadata address of the new file should replace the tail in the base block, that is, the metadata address that was the tail before creating the new file is not the tail anymore, it become a normal item in the list that was once the tail and it can be reached via the "next" field of the file before it. The "next" field of this previous tail should be updated to point to the newly created file, and the tail in base block should be updated in the base block to point to the newly created file. There are also more subtle cases in updating the base block that will be discussed while writing the code of create_file. Let's start with the first part of the function.
void create_file( char *filename, char *buffer )
{
    int metadata_lba = ( base_block->head == 0 ) ? BASE_BLOCK_ADDRESS + 1 : base_block->tail + 2;
    int file_lba = metadata_lba + 1;

    metadata_t *metadata = kalloc( sizeof( metadata_t ) );

    metadata->next_file_address = 0;

    int currIdx;

    for ( currIdx = 0; *filename != '\0' && currIdx < FILENAME_LENGTH - 1; currIdx++, filename++ )
        metadata->filename[ currIdx ] = *filename;

    metadata->filename[ currIdx ] = '\0';

    write_disk( metadata_lba, metadata );
    write_disk( file_lba, buffer );
When the value of the head in the base block is 0, that means there is no files at all in the run-time filesystem. When create_file is called in this situation, that means this file that the caller is requesting to create is the first file in the run-time filesystem, the metadata of this first file can be simply stored in the block right after the base block. In create_file this fact is used to decide the disk address for the metadata of the new file, this address is stored in the local variable metadata_lba which its name is a short for "metadata logical block address". Figure 2 shows the state of 539filesystem after creating the first file A in the run-time filesystem.
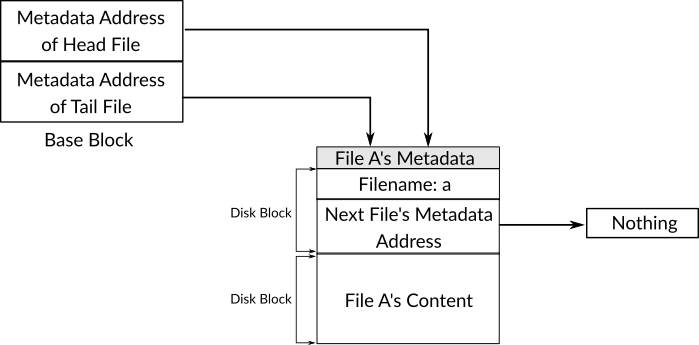
Figure 2: The State 539filesystem After Creating the First File
In case that the run-time filesystem is not empty, that is, the value of head is not 0, then the tail field of base block can be used to decide the metadata address of the new file. As we know, the tail field contains the metadata address of the last file that has been added to the run-time filesystem, and the content of that file is stored in the disk address tail + 1, which means tail + 2 is a free block that can be used to store new data 13, so we choose this address for the new metadata in this case. After that, the disk address of the new content is decided by simply adding 1 to the disk address of the new metadata, the address of the content is stored in the local variable file_lba.
After deciding the disk addresses of the new metadata and file content, we start in creating the metadata of the file to store them later on the disk. As you can see in the code, we allocate a space in the kernel's heap for the new metadata by depending on the type metadata_t, after this allocation, we can use the local variable metadata to fill the fields of the new file metadata. First, we set the value of the "next" field to 0, because, as we mentioned earlier, this new file will be the tail file which means there is no file after it. Then, we copy the filename which is passed as a parameter filename to the filename field of the metadata, in case the passed filename's length is less than the maximum length, then the whole filename is copied, otherwise, only the maximum number of characters of the passed filename is copied and the rest are simply ignored. The final step that is related to the new file is to write the metadata and the file content in the right addresses on the disk, and this is done in the last two lines which use the ATA device driver. The following is the next and last part of create_file which updates the base block depending on the current state of the run-time filesystem.
    if ( base_block->head == 0 )
    {
        update_base_block( metadata_lba, metadata_lba );
    }
    else
    {
        metadata_t *tail_metadata = load_metadata( base_block->tail );

        tail_metadata->next_file_address = metadata_lba;

        write_disk( base_block->tail, tail_metadata );
        update_base_block( base_block->head, metadata_lba );
    }
} // End of "create_file"
When the run-time filesystem is empty, that is, the value of head in the base block is 0, then the new file that we are creating will be both the head and the tail file. As you can see, in the block of if statement that checks whether head equals 0 or not, the not defined yet function update_base_block is used, this function updates the values of head and tail of the base block and write these changes on the permanent copy of the base block on the disk, the disk address of the new file's metadata is simply set as head and tail when update_base_block is called in this case.
The second case is when the run-time filesystem isn't empty, that is, the value of head isn't 0. In this case we need to update the disk address of the tail in the base block to consider the new file as the new tail, furthermore, the "next" field of the previous tail, which is not the tail anymore, should be updated to point to the metadata of the new file, you see in else block that this is exactly what is done.
The function that isn't defined yet load_metadata is used to load the metadata of the previous tail by passing the its disk address a parameter. After that, the local variable tail_metadata will point to that loaded metadata of the tail, and depending on the type metadata_t we can reach the values of the previous tail fields easily. You can see that we simply changed the value of the "next" field to the metadata address of the new file, then we write this modification on the disk and of course on the same location, finally, the tail field is updated in the base block by calling update_base_block which its code is presented next. Figure 3 shows the steps needed to create a new file in 539filesystem as described and implemented in the function create_file.
void update_base_block( int new_head, int new_tail )
{
    base_block->head = new_head;
    base_block->tail = new_tail;

    write_disk( BASE_BLOCK_ADDRESS, base_block );
}
It's too simple, it receives the value of head and tail that we would like to set on the base block, then, the copy of the base block which is stored in the main memory is updated, then, this updated version is overwritten on the base block address on the disk. The following is code of load_metadata which has been used in create_file function.
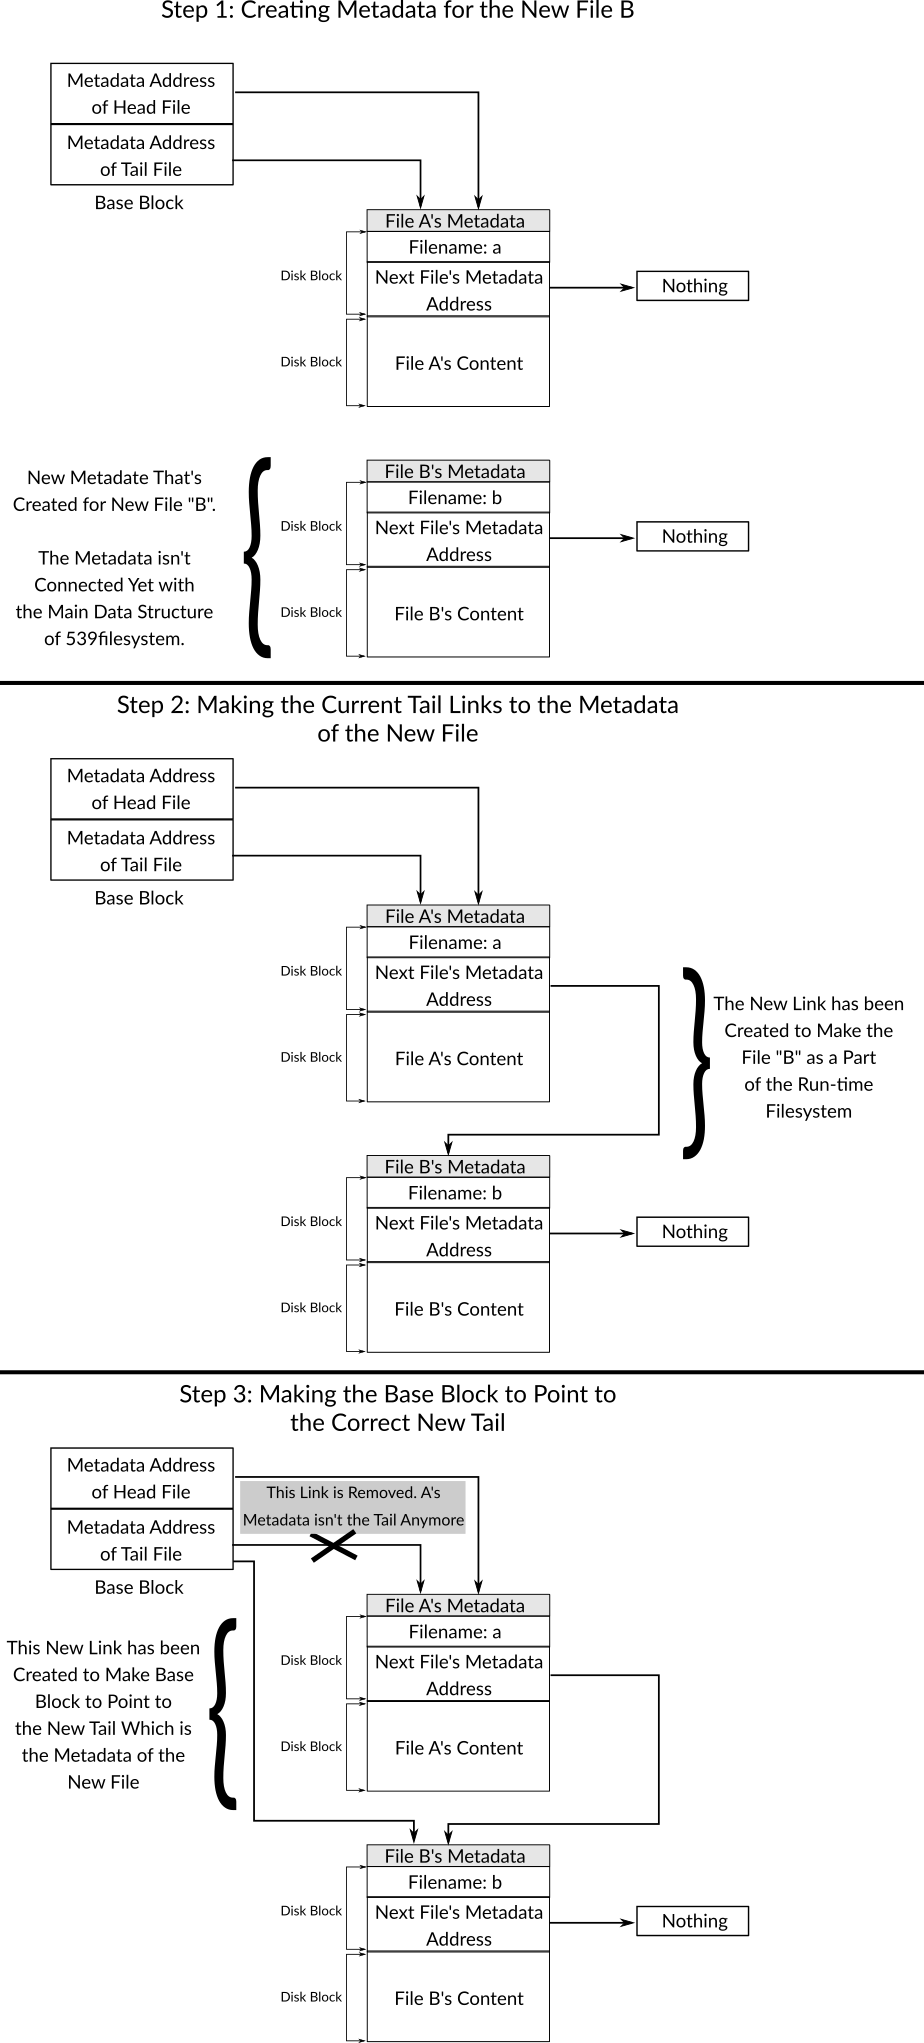
Figure 3: Steps Needed to Create New File in 539filesystem When Run-time Filesystem isn't Empty
metadata_t *load_metadata( int address )
{
    metadata_t *metadata = read_disk( address );

    return metadata;
}
Simply, it receives a disk address and assumes that the block which is presented by this address is a metadata block. It loads this metadata to the main memory by loading the content of the address from the disk through the device driver function read_disk. The following is a sample of using create_file to create a new file in the run-time filesystem.
char *data = kalloc( 512 );

strcpy( data, "The content of the first file on 539filesystem" );

create_file( "first_file", data );
6.3.2.2 Listing All Files
To list all files on 539filesystem, the normal traversal algorithm of linked-list can be used. In linked-list, to traverse all list's item you need to start with the head of the list, then to reach the second item of the list, the "next" field of the head can be used, and so on for the rest of items in the linked-list. The "next" field is the component which links the items of the list with each other. You keep traversing the items until the tail of the list is reached and you can check whether the current item is the tail or not by checking its "next" field, in case its value is 0 (or usually in higher-level implementations NULL) then you know that the current item is the tail which means the list is over. Another way to check if the current item is the tail is by comparing its address with the one which is stored in the tail field of the linked-list, in our case, the base block. The following is the code of the function list_files which uses the algorithm we just described, it returns an array of strings, each item of this array is a filename.
char **list_files()
{
    // Part 1

    if ( base_block->head == 0 )
        return -1;

    // Part 2

    char **list;

    list = kalloc( get_files_number() * sizeof( char * ) );

    // Part 3

    metadata_t *curr_file = load_metadata( base_block->head );

    int idx = 0;

    while ( 1 )
    {
        list[ idx ] = curr_file->filename;

        if ( curr_file->next_file_address == 0 )
            break;

        curr_file = load_metadata( curr_file->next_file_address );

        idx++;
    }

    return list;
}
The first part of list_files handles the case where the run-time filesystem is empty, so, it returns -1 to indicate that there is no files to list. In case that the run-time filesystem isn't empty, the function in the second part allocates a space in kernel's heap for the list of the filenames, as you can see, we have used a function named get_files_number to decide how many bytes we are going to allocate for this list, based on its name, this function returns the number of files in the run-time filesystem, its code will be presented in a moment. In the third part, the function is ready to traverse the list of files metadata which are stored in the disk and are reachable starting from the disk address which is stored in the head field in the base block.
Initially, the metadata of the head file is loaded into memory and can be accessed through the local variable curr_file, then, the loop is started. In the body of the loop, the filename of the current file metadata is appended to the result's variable list, in the first iteration of this loop the filename will be the one that belong to the head file. After appending the filename of the current file to list, the function checks if the current file is the tail file or not by checking the value of the "next" field next_file_address, if it is 0 then the current file is the tail, so, the loop should break and the result should be returned to the caller. In case that the current file isn't the tail file, then the metadata of the next file is loaded by using the disk address which is stored in the "next" field of the current file, the current value of curr_file is replaced with a memory address that points to the metadata of the next file which will be used in the next iteration of the loop, the same operation continues until the function reaches the tail which breaks the loop and returns the list to the caller. The following is the code of get_files_number that was used in list_files and, as mentioned earlier, returns the number of stored files.
int get_files_number()
{
    if ( base_block->head == 0 )
        return 0;

    int files_number = 0;

    // ... //

    metadata_t *curr_file = load_metadata( base_block->head );

    while ( 1 )
    {
        files_number++;

        if ( curr_file->next_file_address == 0 )
            break;

        curr_file = load_metadata( curr_file->next_file_address );
    }

    return files_number;
}
As you can see, it works in a similar way as list_files, the main difference is that get_files_number keep tracking the number of iterations to fetch the number of files instead of copying the filename of the current file to another list. The following is a sample of using list_files.
void print_fs()
{
    char **files = list_files();

    for ( int currIdx = 0; currIdx < get_files_number(); currIdx++ )
    {
        print( "File: " );
        print( files[ currIdx ] );
        println();
    }

    print( "==" );
    println();
}
6.3.2.3 Reading a File
The function read_file reads the content of a file which its name is passed as a parameter, then, the address of the buffer that stores that content of the file is returned to the caller. Because the file size in 539filesystem is always 512 bytes then read_disk of ATA device driver can be called just one time to load a file.
To implement read_file, the main thing to do is to find the disk address of the file that the caller passed its name as a parameter, after knowing how to traverse the list of files in 539filesystem, we can easily use this algorithm to find the disk address of a file given its name. The following is the code of read_file.
char *read_file( char *filename )
{
    int address = get_address_by_filename( filename );

    if ( address == 0 )
        return 0;

    char *buffer = read_disk( address + 1 );

    return buffer;
}
The task of finding the disk address of the file's metadata is performed by the function get_address_by_filename which we will define in a moment. When the metadata of the file is not found, read_file returns 0, otherwise, the file will be read by calling read_disk, as you can see, the parameter that is passed to this function is address + 1 since the value of address is the disk address of the file's metadata and not its content. Finally, the address of the buffer is returned to the caller. The following is the code of get_address_by_filename.
int get_address_by_filename( char *filename )
{
    metadata_t *curr_file = load_metadata( base_block->head );
    int curr_file_address = base_block->head;

    int idx = 0;

    while ( 1 )
    {
        if ( strcmp( curr_file->filename, filename ) == 1 )
            return curr_file_address;

        if ( curr_file->next_file_address == 0 )
            break;

        curr_file_address = curr_file->next_file_address;
        curr_file = load_metadata( curr_file->next_file_address );
    }

    return 0;
}
This function receives a filename as a parameter, then, it traverse the list of the files, with each iteration, the name of the current file is compared to the passed filename by using the function strcmp that we already defined, if the name of the current file doesn't match the passed filename, the function loads the metadata of the next file by using load_metadata and continues to the next iteration of the loop to check whether the next file is the required file or not, and so on, if the file isn't found, then the loop exits and 0 is returned. When a match is found, the disk address of the current file's metadata which is stored in the local variable curr_file_address is returned to the caller. The following is a sample of using read_file.
print( read_file( "first_file" ) );6.3.2.4 Deleting a File
As in creating a file, deleting a file may cause modifications on the base block or even on another file's metadata. Given a filename, the function delete_file deletes this file from the run-time filesystem, technically, the content of the file will not be overwritten with zeros for example, instead, only the reference to this file is removed from either the base block in case that file is the head, from another file's "next" field or both in case that is file is the tail.
As mentioned earlier, this design decision of not overwriting the content of the file, that the user would like to delete, with zeros for example on the disk is taken in real-world filesystems to make the delete process faster and this decision made it possible for deleted files recovery software to exist, this type of software can recover deleted files since their contents are still on the disk but there is not reference to them in the run-time filesystem's data structure, however, the space of deleted files are considered as free space by the filesystem and it can be used anytime, that's why the recovery software cannot ensure you that it could recover all deleted files because the space which was occupied by the deleted file (or part of it) may be now used by another file. The following is the code of delete_file.
void delete_file( char *filename )
{
    // Part 1

    int curr_file_address = get_address_by_filename( filename );

    if ( curr_file_address == 0 )
        return;

    metadata_t *curr_file_metadata = read_disk( curr_file_address );

    // Part 2

    if ( get_files_number() == 1 )
    {
        update_base_block( 0, 0 );

        return;
    }

    // Part 3
    if ( curr_file_address == base_block->head )
    {
        update_base_block( curr_file_metadata->next_file_address, base_block->tail );
    }
    // Part 4
    else
    {
        int prev_file_address = get_prev_file_address( curr_file_address );

        metadata_t *prev_file = load_metadata( prev_file_address );

        prev_file->next_file_address = curr_file_metadata->next_file_address;

        write_disk( prev_file_address, prev_file );

        if ( curr_file_address == base_block->tail )
            update_base_block( base_block->head, prev_file_address );
    }
}
The first part tries to find the metadata address of the file in question by using the function get_address_by_filename, in case the file is not found, the function does nothing and returns. Otherwise, the metadata of the file is loaded and the local variable curr_file_metadata is used to point to that metadata in the main memory.
In the second part, the most basic case of deleting a file is handled, when there is only one file in the run-time filesystem, nothing need to be done but updating the base block to indicate that the disk address of both head and tail is 0 which means, as mentioned earlier, that the run-time filesystem is empty. The function update_base_block is used to update the base block. Figure 4 shows this case.
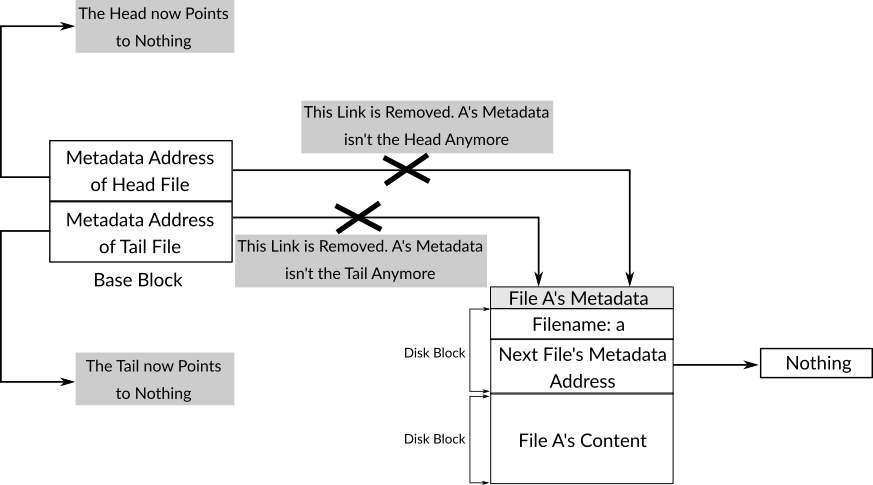
Figure 4: The State 539filesystem After Removing the Only File
The third part handles the case where the file to be deleted is the head file, in this case, to remove the reference of this file, we simply replace the current value of the head in base block with the metadata address of the file right next to the head which can be found in the "next" field of the current head, so, the second file will become the head file after finishing the delete process. Figure 5 shows this case.
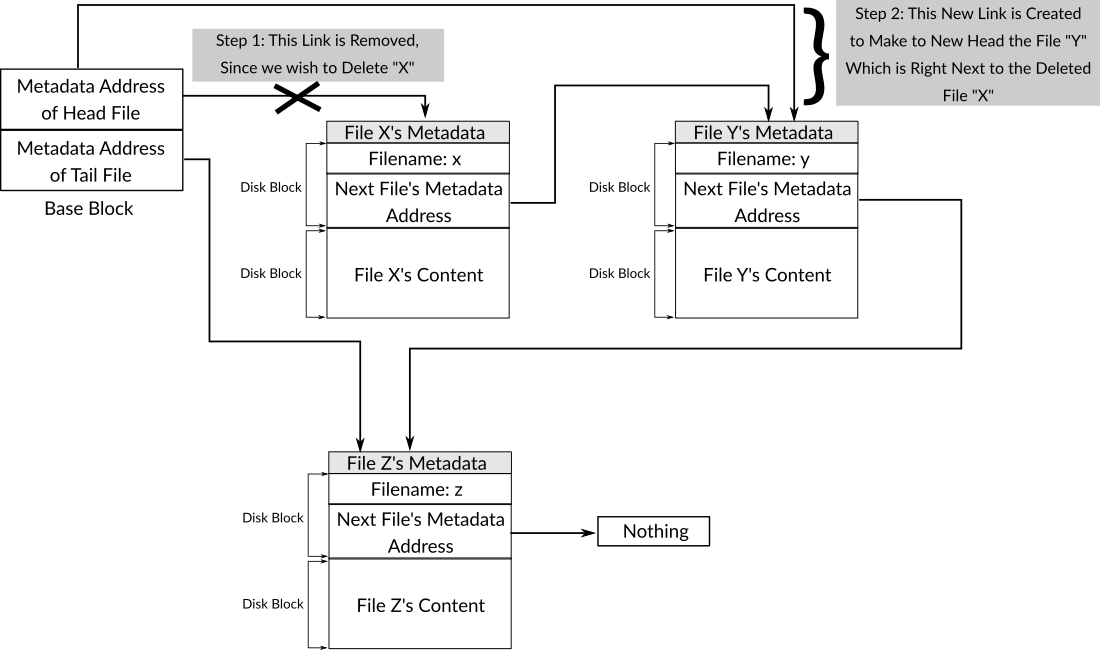
Figure 5: The Steps Needed to Delete the Head File in 539filesystem
The fourth part of the function handles the case where the file to be deleted is not the head, in this case, the previous file's metadata needs to be found to modify its "next" field by replacing it with the value of the "next" field of the file that we would like to delete, in this way, we will be sure that the reference of the file to be deleted is removed from 539filesystem data structure, and that the previous file is linked with the next file. Figure 6 shows this case. Also, in this case, the file in question may be the tail, therefore, the tail on the base block should be replaced with the disk address of the previous file's metadata. Figure 7 shows this case.
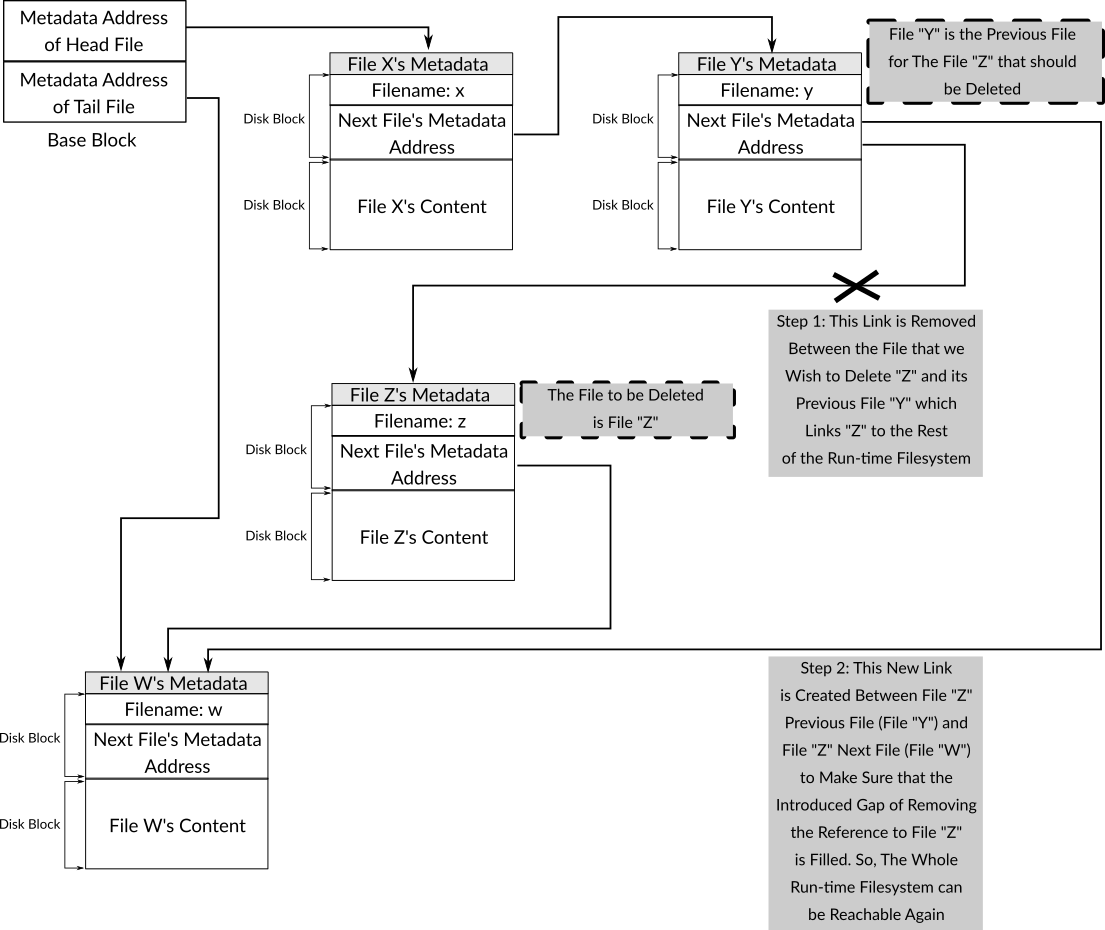
Figure 6: The Steps Needed to Delete a File which is not the Head
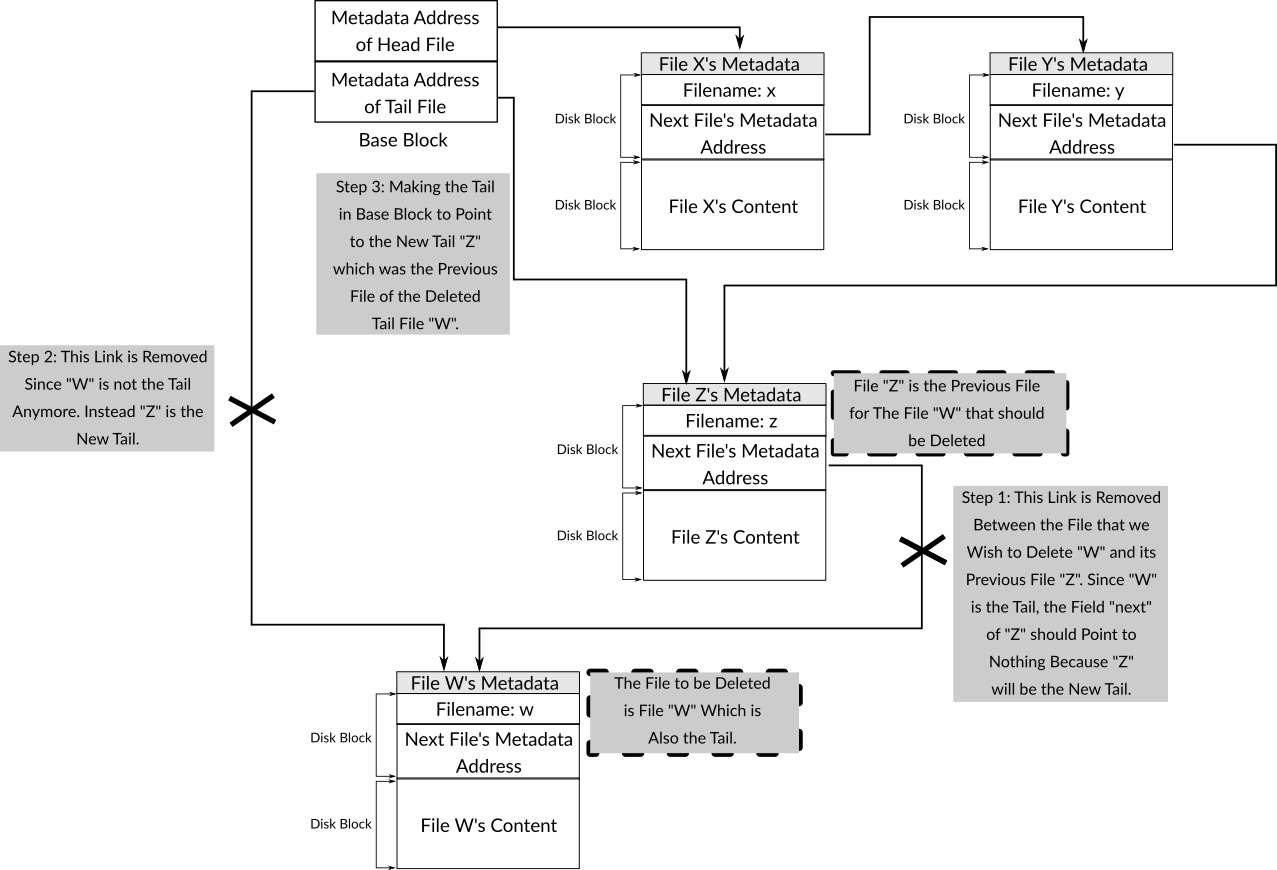
Figure 7: The Steps Needed to Delete a File which is not the Head but it's a Tail in 539filesystem. The File to Delete Here is "W".
As you can see in the first code line of this fourth part, a function named get_prev_file_address is used to get the disk address of previous file's metadata to be able to perform the described operation. By using this address, the metadata is loaded by using load_metadata in order to modify the "next" field of the previous file, the updated metadata is written on the same address in the disk. Finally, the function checks if the file to be deleted is the tail file or not, if this is the case, the tail in base block is updated to point to the previous file which ensures that there is no any reference to that file in the filesystem's data structure. The following is the code of get_prev_file_address which needs no more explanation.
int get_prev_file_address( int address )
{
    metadata_t *prev_file = load_metadata( base_block->head );
    int prev_file_address = base_block->head;

    while ( 1 )
    {
        if ( prev_file->next_file_address == address )
            return prev_file_address;

        prev_file_address = prev_file->next_file_address;
        prev_file = load_metadata( prev_file->next_file_address );
    }

    return -1;
}
6.4 Finishing up Version NE and Testing the Filesystem
And now version NE of 539kernel is ready. It contains a basic ATA device driver and 539filesystem. The following is its Makefile which adds the new files to the compilation list, also, this time we are going to use Bochs instead of QEMU to test 539filesystem since kernel.img which represents the hardisk is tailored for the former.
ASM = nasm
CC = gcc
BOOTSTRAP_FILE = bootstrap.asm
SIMPLE_KERNEL = simple_kernel.asm
INIT_KERNEL_FILES = starter.asm
KERNEL_FILES = main.c
KERNEL_FLAGS = -Wall -m32 -c -ffreestanding -fno-asynchronous-unwind-tables -fno-pie
KERNEL_OBJECT = -o kernel.elf

build: $(BOOTSTRAP_FILE) $(KERNEL_FILE)
    $(ASM) -f bin $(BOOTSTRAP_FILE) -o bootstrap.o
    $(ASM) -f elf32 $(INIT_KERNEL_FILES) -o starter.o
    $(CC) $(KERNEL_FLAGS) $(KERNEL_FILES) $(KERNEL_OBJECT)
    $(CC) $(KERNEL_FLAGS) screen.c -o screen.elf
    $(CC) $(KERNEL_FLAGS) process.c -o process.elf
    $(CC) $(KERNEL_FLAGS) scheduler.c -o scheduler.elf
    $(CC) $(KERNEL_FLAGS) heap.c -o heap.elf
    $(CC) $(KERNEL_FLAGS) paging.c -o paging.elf
    $(CC) $(KERNEL_FLAGS) ata.c -o ata.elf
    $(CC) $(KERNEL_FLAGS) str.c -o str.elf
    $(CC) $(KERNEL_FLAGS) filesystem.c -o filesystem.elf
    ld -melf_i386 -Tlinker.ld starter.o kernel.elf screen.elf process.elf scheduler.elf heap.elf paging.elf ata.elf str.elf filesystem.elf -o 539kernel.elf
    objcopy -O binary 539kernel.elf 539kernel.bin
    dd if=bootstrap.o of=kernel.img
    dd seek=1 conv=sync if=539kernel.bin of=kernel.img bs=512 count=20
    dd seek=21 conv=sync if=/dev/zero of=kernel.img bs=512 count=2046
    bochs -f bochs
To run Bochs, it should be configured properly. As you can see from the presented Makefile, a file named bochs is passed to Bochs to use it as a configuration file, so, by using it we don't need to configure Bochs everytime we use it to run 539kernel. The following is the content of bochs file which should reside in the same directory of 539kernel's code.
plugin_ctrl: unmapped=1, biosdev=1, speaker=1, extfpuirq=1, parallel=1, serial=1, gameport=1, iodebug=1
config_interface: textconfig
display_library: x, options="gui_debug"
memory: host=32, guest=32
romimage: file="/usr/share/bochs/BIOS-bochs-latest"
vgaromimage: file="/usr/share/bochs/VGABIOS-lgpl-latest"
boot: disk
ata0: enabled=1, ioaddr1=0x1f0, ioaddr2=0x3f0, irq=14
ata0-master: type=disk, mode=flat, translation=auto, path="kernel.img", cylinders=2, heads=16, spt=63, biosdetect=auto, model="Generic 1234"
pci: enabled=1, chipset=i440fx
vga: extension=vbe, update_freq=5
cpu: count=1, ips=4000000, model=bx_generic, reset_on_triple_fault=1, cpuid_limit_winnt=0, ignore_bad_msrs=1, mwait_is_nop=0
cpuid: family=6, model=0x03, stepping=3, mmx=1, apic=xapic, sse=sse2, sse4a=0, sep=1, aes=0, xsave=0, xsaveopt=0, movbe=0, adx=0, smep=0, avx=0, avx_f16c=0, avx_fma=0, bmi=0, xop=0, tbm=0, fma4=0, vmx=1, x86_64=1, 1g_pages=0, pcid=0, fsgsbase=0, mwait=1
cpuid: vendor_string="GenuineIntel"
cpuid: brand_string="              Intel(R) Pentium(R) 4 CPU        "
As you can see, it tells Bochs the specifications of the virtual machine we would like to run, also, the file which represents the hard disk kernel.img is passed to Bochs here. The following code can be used to test 539filesystem. It should be inside kernel_main after the initializations and processes creations.
    char *data = kalloc( 512 );
    strcpy( data, "The content of the first file on 539filesystem" );
    create_file( "first_file", data );

    // ... //

    char *data2 = kalloc( 512 );
    strcpy( data2, "SECOND FILE in 539filesystem" );
    create_file( "second_file", data2 );

    // ... //

    char *data3 = kalloc( 512 );
    strcpy( data3, "THIRD FILE in 539filesystem" );
    create_file( "third_file", data3 );

    // ... //

    print( read_file( "first_file" ) ); println();
    print( read_file( "second_file" ) ); println();
    print( read_file( "third_file" ) ); println();

    // ... //

    print_fs();
    delete_file( "first_file" );
    print_fs();
This code creates three files, prints their contents, prints the run-time filesystem tree through the function print_fs and finally deletes the file first_file then prints the run-time filesystem tree again to show that the file has been deleted successfully. The function print_fs already defined in this chapter. To make everything works file, you need to keep the definition of print_fs below kernel_main and put the prototype void print_fs(); above kernel_main. Also, to test the filesystem you need to make sure that the interrupts are disabled, the easiest way to do that is modifying starter.asm by commenting the line sti which is before call kernel_main in the routine start_kernel. After that you should see the result of the above testing code after the kernel boots up.
Incompletely of course, to keep 539kernel as simple as possible, only the basic parts of resources management were presented.↩
The word language here is a metaphor, it doesn't mean a programming language.↩
Which are, as you know, parts of the registers
EAXandEDXrespectively.↩To my best knowledge its performance is better than the normal way of using
mov.↩You may notice that I've omitted the epilogue of routines that creates a new stack frame, this decision has been made to make the matters simpler and shorter, you are absolutely free to use the calling convention and most probably using it is a better practice.↩
The fact that we need to read a word here instead of a byte is the reason of using the register
AXinstead ofALas the first operand forininstruction in the functiondev_read.↩The term metadata means data about data↩
The design part of programming languages is the language specifications.↩
The implementation part of programming languages is a compiler or interpreter.↩
In linked-list data structure's term: the head↩
In linked-list data structure's term: the tail↩
In real-world situation, giving a whole block for a metadata of
260bytes can be considered as a waste of space. One of real filesystems goals is to use as little space as possible to maintain the structure of the run-time filesystem.↩This is ensured since 539filesystem stores the files in order, so, there will be no files after the tail unless it is a deleted file which can be overwritten and causes no data lose.↩